Let’s be real for a moment. You bought a robot vacuum to make your life easier, not to add another complicated chore to your list. It’s your tireless little helper, whizzing around and gobbling up dust bunnies, pet hair, and those mystery crumbs that always seem to appear. But here’s the secret sauce to keeping that magic alive: knowing How To Clean Robot Vacuum Properly. If you neglect it, that high-tech marvel will slowly turn into a glorified, and rather expensive, doorstop.
Think of it like a car. You wouldn’t drive 10,000 miles without an oil change, right? Your robot vacuum is a sophisticated piece of machinery that needs regular maintenance to maintain its peak suction power, navigate intelligently, and last for years. In this guide, we’re going to break it all down, step-by-step, in a way that’s simple, fast, and incredibly effective. Let’s get your robotic sidekick back to pristine, dirt-devouring condition.
Why a Clean Robot Vacuum is a Happy Robot Vacuum
Before we roll up our sleeves, let’s quickly cover why this is so important. A dirty robot isn’t just an aesthetic problem; it’s a performance killer.
- Loss of Suction Power: A clogged filter or a tangled brush roll can drastically reduce your vacuum’s ability to pick up debris. You’ll start noticing it leaving things behind.
- Navigation Nightmares: Your robot relies on an array of sensors to “see” the world. If its cliff sensors, wall sensors, or high-tech LiDAR turret are covered in a film of dust, it can get confused, bump into things, or refuse to go near stairs.
- Shorter Lifespan: When the motor has to work harder to pull air through a dirty filter or spin a jammed brush, it causes extra wear and tear, potentially shortening the life of your investment.
- Poor Air Quality: The HEPA filter in your robot vacuum is designed to trap tiny allergens and dust particles. A clogged filter can’t do its job, and might even start releasing unpleasant odors back into your home.
Your Quick and Easy Robot Vacuum Cleaning Toolkit
You don’t need a professional workshop for this. Most of what you need is probably already in your home.
- A soft, dry microfiber cloth
- A small pair of scissors or a seam ripper (for hair)
- A soft-bristled brush (an old toothbrush works wonders)
- A trash can
How to Clean Robot Vacuum Properly: The Step-by-Step Breakdown
Alright, let’s dive into the main event. We’ll go through each component one by one. I recommend doing this entire routine at least once a month, with some smaller tasks performed more frequently.
1. The Dustbin: Emptying the Treasure Trove
This is the most obvious step, but there’s a right way to do it.
- Remove the Dustbin: Follow your manufacturer’s instructions to eject the dustbin.
- Empty It: Dump all the contents into your trash can.
- Wipe or Wash: Most dustbins are washable. If yours is, rinse it under lukewarm water and let it air dry completely before reinserting it. If not, a thorough wipe with a dry microfiber cloth is perfect. Never put a wet dustbin back in the robot!
Pro Tip: If you have a model with a self-emptying base, your job is much easier. Just remember to check the bag or bin in the base station itself and replace it when it’s full.
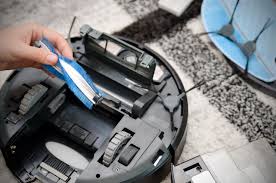
2. The Brushes: Detangling the Main Event
The main brush roll is a magnet for hair, string, and fibers. In my house, with a golden retriever shedding a whole new dog every day, this is the most critical step.
- Access the Brush: Flip your robot over. There’s usually a small cover held in by a couple of clips. Pop it off to expose the main brush.
- Remove the Brush: Lift the brush roll out completely.
- Cut and Pull: Use your scissors or seam ripper to carefully cut through any wrapped-around hair and string. Be careful not to cut the bristles themselves. Once cut, the hair should pull away easily.
- Clean the Side/Edge Brush: Don’t forget the little spinning side brush! These are often held on by a small screw or just pop off. Remove it and clear any tangled hair from its base and bristles.
- Wipe the Brush Housing: Before putting the clean brushes back, wipe down the area where they sit to remove any lingering dust.
3. The Filter: Your Robot’s Lungs
The filter is your unsung hero, trapping allergens and fine dust. Cleaning it properly is key to maintaining strong suction.
- Locate and Remove: The filter is almost always located inside or attached to the dustbin.
- Tap it Clean: Take the filter to your trash can and gently tap it against the inside to dislodge all the fine dust. Do not bang it too hard, as this can damage the delicate filter material.
- To Wash or Not to Wash? Check your manual! Some filters are washable, but many are not. Never wash a standard HEPA filter with water, as it will destroy its ability to trap fine particles. If it’s washable, rinse it under cool water and let it air dry for at least 24 hours before reinstalling.
4. The Sensors and Charging Contacts: The Brains of the Operation
This is the step most people forget, and it’s often the cause of strange behavior. Your robot’s sensors are its eyes.
- Find the Sensors: Look for small, dark, transparent windows on the sides and bottom of your robot. These are the cliff sensors (to prevent falls) and wall-following sensors. If you have a model with a raised turret on top, that’s the LiDAR sensor.
- Wipe Gently: Take your dry microfiber cloth and gently wipe every single sensor you can find. A clean sensor ensures accurate smart navigation and mapping.
- Clean the Charging Contacts: Locate the two metal strips on the underside of your robot and the corresponding ones on the charging dock. Wipe them with the dry cloth to ensure a solid connection for charging.
5. The Wheels: Keeping Things Rolling
The wheels can also get tangled with hair and debris, which can hinder movement.
- Inspect and Pull: Check the main drive wheels and the front caster wheel. Pull out any hair or debris that has gotten wrapped around the axles.
- Pop and Clean: The front caster wheel can often be popped out for a more thorough cleaning of its socket.
A Simple Robot Vacuum Maintenance Checklist
To make this a habit, follow this simple schedule:
- After Every Run:
- [ ] Empty the dustbin (unless you have a self-emptying model).
- Once a Week:
- [ ] Check and clean the main brush and side brush for tangled hair.
- [ ] Wipe down all sensors and charging contacts with a dry cloth.
- Once a Month:
- [ ] Tap out or wash the filter (according to manufacturer’s instructions).
- [ ] Check the wheels for debris.
- [ ] Wipe down the entire body of the robot.
“Users often blame a robot’s ‘smart navigation’ for errors, when the root cause is simply a dirty LiDAR sensor or a smudged cliff sensor. A five-second wipe can solve 90% of sudden navigation problems. It’s the most impactful, low-effort maintenance task you can perform.”
— Dr. Alistair Finch, Robotics Engineer
Frequently Asked Questions
How often should I truly clean my robot vacuum?
A quick clean (emptying the bin, checking the brush) should happen weekly, especially if you have pets or high-traffic areas. A full, deep clean as described above is best done once a month to keep it in top shape.
Can I use water or cleaning solutions on the sensors?
No, you should never use water or chemical cleaners on the sensors. A soft, dry microfiber cloth is all you need. Liquids can damage the sensitive electronics inside.
My robot vacuum is leaving streaks when it mops. What’s wrong?
If you have a hybrid vacuum-mop, streaks are usually caused by a dirty mop pad or using too much cleaning solution (or the wrong kind). Ensure you are washing the mop pad after every use and only using the manufacturer-recommended cleaning solution diluted with water.
What’s the best way to deep clean the HEPA filter?
For a non-washable HEPA filter, the best deep clean is to use a handheld vacuum with a brush attachment to gently suck the dust out of the filter’s pleats. This is more effective than just tapping it. Remember to replace the filter every 3-6 months.
My robot vacuum smells bad. How do I fix that?
A bad smell is almost always coming from a dirty dustbin or filter. Thoroughly wash the dustbin and clean or replace the filter. If you have pets, pet hair and dander can contribute to odors, making regular cleaning even more crucial.
Keeping the Dream of Automated Cleaning Alive
Your robot vacuum is a remarkable piece of technology, but it isn’t a magical, self-sustaining appliance. It’s a partner in keeping your home clean. By taking just 10-15 minutes each month to follow these steps on how to clean robot vacuum properly, you’re not just performing maintenance; you’re ensuring it continues to perform at its best, navigate with precision, and serve your home effectively for years to come. A little care goes a long way in keeping the automated dream alive.